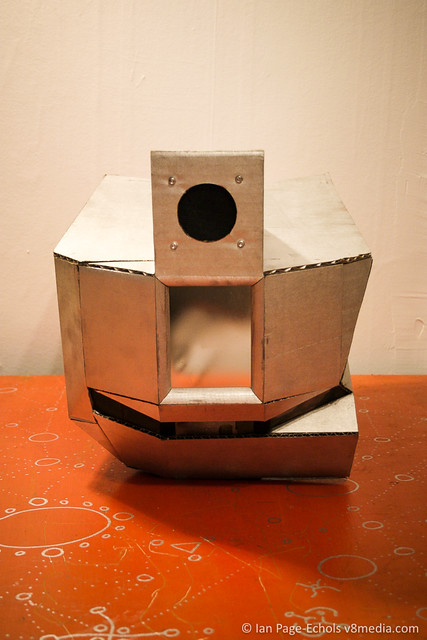
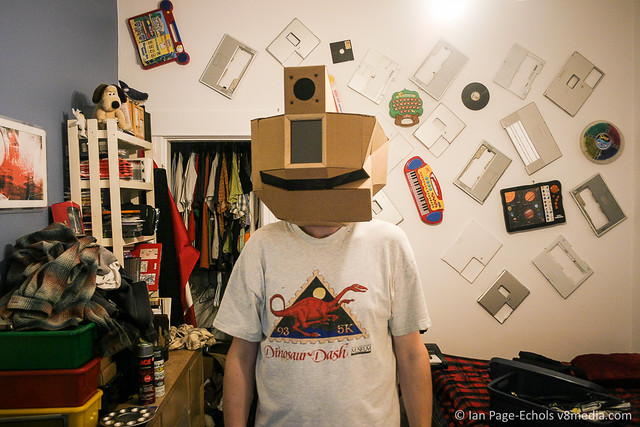
Audionic Videotronic Electronic Robotic
I’ve been wanting to make a robot costume for Halloween for quite some time. For Halloween of 2004, I finally went ahead and did it. Instead of building a cumbersome cardboard box to wear and do the robot, I decided to just build a helmet and wear a shiny silver Adidas track suit. Funny thing is that I didn’t finish the costume until well into the morning, missing any parties that were happening. Or at least all of them I knew of. That’s ok though, I had fun. Next year, I plan to actually wear it.
Ok, so, you want to build a robot helmet? Here’s a possible parts list:
Laptop with audio input (just need the logic board, drive, battery)
Karaoke tape player (cheap at thrift stores, like $1)
Micro-cassette recorder (to send audio to the laptop)
Sony PSOne LCD Display or similar (these are actually really high quality)
Cardboard, or some other easily cut and glued material
Foam for padding
Twisty ties
Hot glue gun and lots of glue sticks
Spray paint in desired robot helmet color
Screen material for speaker grille and for your eyes to see through
Thin plexiglas to protect the LCD screen
Various cables and adapters found and made
Misc bolts to hold on the speaker, or just more hot glue
This is definitely looking mostly like a list of the old things you find in the back of your kitchen drawer, no? Well, maybe besides the plexiglas and the laptop. And maybe the karaoke thing.
Cardboard is good stuff. My studio classes from architecture school really shine through in the fabrication of robot skulls. Hot glue guns are your friend. Funny thing about glue guns is that I always thought they seemed really annoying and I didn’t try them until after college. Hot glue is one of my favorite tools now. Right up there with duct tape.
The specs I wanted in my costume were: an LCD display that actually displayed things, a speaker that I wanted people to be able to hear, a mic I had to be able to talk into, some form of computing to process audio and display video, and a head that I had to fit into the thing once complete. I started by making a frame for the LCD as I wanted to make sure not to damage it. I even went so far as to lay a thin plexiglass sheet in front to protect the LCD panel.

I set this face down on the table and started attaching other shapes on, sticking my head on the table every once in a while to make sure something would be far enough away from me, or that it would fit one of the items. The recorder is attached in a way that it juts out to the left of the main shape. Since I didn’t want a fully symmetrical shape, this was fine with me.
To test fit for the back angles, I had my digital camera on a tripod and used the remote to take shots of what I could not see.
Most Halloween costumes are just decorative. I wanted a robot costume that was somewhat functional. I had the idea to have a computer (which happened to be in pieces at the time) modulating my voice in a robot kind of way. I realized about two parsecs later (yeah, I know) that I could use the screen from my toy laptop and also give my robot a smiling face. Since this was Halloween night, it’s obvious that I just was not in a party mood.

The voice comes in through the microcassette recorder, with the tape paused. This could have been a cheapo mic, or even a USB mic, anything to get loud enough input without getting much background noise. I think the micro cassette was both available at 4 am and also it was amplified a bit compared to the cheap mics I had sitting around. The audio output from the microcassette goes into a salvaged 12″ PowerBook and into a program called Plogue Bidule. This program can route audio through filters and equalizers and all sorts of things. So I played around for a while and came up with something kind of robotic.

The sound from the laptop gets piped into the hacked apart karaoke tape player, in order to be amplified through the karaoke machine’s speaker. I wired a switch to turn the karaoke machine on and off. I figured if I coughed, I didn’t need to robotocize that. I also had no idea how long the batteries would last.

Below is an image of the circuit board for the karaoke tape player. On the left there is the audio input coming from the computer, and the switch to turn on and off the power. On the far right is the speaker connection, and coming off the bottom right is the power.

Next is an image of the battery connections. Luckily, this board was quite specific in it’s markings. That made it pretty easy to deal with. Here you can see that the positive was on the left and that my soldering job was not so great.

I connected these wires to a battery holder that gets velcroed or hot glued somewhere out of the way, probably across from the laptop to balance things out. I used the same amount and kind of batteries as the device took initially using a battery holder from Radio Shack (part 270-396). You could also use something like a radio controlled car or video camera battery if it’s of a similar power rating.
Here is the speaker connection. The speaker wires had to be elongated to be able to reach from where this board is located.

This next one is kind of hard to see. The black wire is connected to a point marked GND for ground. To get audio into the board, I wired ground to here and the other wire connected to the place marked SIG for signal. The wires for audio came from a stereo headphone jack cable that I simply cut one connector off of. Since I only had mono inputs on the karaoke board, I just connected the left and right leads together when soldering onto the board. This combined the stereo output from the computer into a cheap and easy mono output. If you wanted to, you could have two speakers in the helmet aiming a bit away from the front center and make sure the laptop was outputting stereo effects. That could be very impressive, and stereo psychologically makes the output volume higher, so could help your audio cut through a loud party. I might even do that for next halloween. It would be great, simplification wise to see if the batteries could power two boards at once. You’d probably still end up with the laptop being powered separately.

To hook up the switch (any switch that will stay on after you flick or press it), I used the same ground connection, and the other wire connected to CTRL, or control point.
Here is an image of the viewing area where my eyes were looking out. I wanted it to look something like a vent or neck divider or something. Anything so that it wouldn’t draw eyes to it. I ended up using two layers of light plastic screen material like you might use for a screen door or window. I could still see out pretty well, and it made it less obvious that there was actually a human in the costume.

Here is an image of the speaker bolted into the top section of my helmet. Any time you can use real hardware like bolts, sheet metal, fans, or anything a real robot might have, it makes the effect that much better. On the very top you can see the wires and a piece of a fan that I install into the top. My thinking here was partially for effect, but mostly because I didn’t want to be in an uncomfortable outfit for very long. Turns out the box is large enough compared to my head that there was airflow.

Below are a couple images of the bottom front of the helmet showing placement of the voice input, some of the construction details of the eye piece, and the general mess you can have going on inside as long as you pay attention to the outside.


Related Links:
Plogue Bidule
Troikatronix Isadora
Radio Shack battery holder for 4 “D” Cells (part 270-396)


